The following guide details best practices for implementing the New Fully Accessible and Responsive Web Pages released with Aeon v5.0.
To ensure any changes made to the default web pages adhere to accessibility standards, please review the W3C Web Content Accessibility Guidelines and the Section 508 Accessibility Program.
To maintain responsive web design best practices, please review the Bootstrap 4 documentation before making changes. For example, logo images can be made accessible in both the PC and mobile view by adding the bootstrap class "img-fluid" as mentioned in the Bootstrap image documentation.
Table of Contents
Step One: Download the New Pages and Upload to Testweb
Follow the steps below to download the new v5.0 Aeon web pages and add them to your Testweb directory. Please note that Aeon must be updated to v5.0 in order to use the v5.0 web pages.
- Download the latest version of the v5.0 default web pages from the Aeon Downloads page.
- Make a backup of the current files in your Testweb directory.
-
Move the v5.0 pages into your Testweb directory via GitHub or, if you have direct access to your server, by copying the files into the Testweb folder (C:\Program Files (x86)\Aeon\Web\testweb). Your local Aeon administrator or Atlas can also assist you with this process, if necessary.
Atlas-hosted sites in the PCI environment (those that use a credit card payment gateway) will need to coordinate with Atlas Support staff to make backups and to upload any new pages into Testweb. For assistance, please contact Atlas Support at support@atlas-sys.com. - View the new pages and decide which edits you would like to make using the information in step two of this article as a guide by logging into the test web pages via the Testweb URL: http://yourAeonWebAddress/testweb/logon.html
- Keep a copy of the v5.0 pages on your local machine, and use these to make your edits with an application such as Notepad++ or Visual Studio Code.
- After making changes to the files on your local machine, re-upload the new files to your Testweb directory to view and test your changes.
Step Two: Make Customizations and Test
Simple Customizations | Testing the New Web Pages with OpenURL | Testing the New Web Pages with EAD Finding Aids
Before You Begin: Best Practices for Editing the Web Pages
- Make changes on a copy of the web page files saved to your local machine rather than directly to the files hosted on your server within the Testweb directory.
- Limit the number of changes made at once, and test after each change. Make sure to:
- Verify that all required fields are working properly.
- Make test requests through the new web pages, then check the Aeon Client to verify that the information was transferred correctly.
- Add comments to the code each time you make a change, explaining what you have changed and why.
- For CSS files, use the format /* Comment Text */
- For HTML files, use the format <!-- Comment Text -->
- Hidden fields for username, sessionid, and formstate
- The <#FORMSTATE> DLL tag
- Aeon.dll or any other DLL files in your web directory
Simple Customizations
Add a Logo | Edit the Navigation Bar Options | Edit Font and Color | Add or Change Fields on Forms
The following list contains a few easy changes you can make to the web pages in order to customize them to your needs. Please make sure to ask your marketing department if you will need to use any specific fonts, colors, or logos for branding.
Add a Logo
To add a logo to your web pages, follow these steps:
- Obtain a copy of the image file for the logo from your marketing department.
- Place a copy of this file in the images folder located within the Testweb directory: "testweb\css\images".
- Add the code for the logo to Logon.html (default line 27) and Include_header.html (default line 7):
|
Change this: |
|
To this: |
Edit the Navigation Bar Menu Options

You can edit the options that appear on the dropdown menus in the navigation bar by making the following changes to the Include_nav.html file.
Changing the Name of a Menu Option
To change the name of an option that appears on a dropdown menu, you will need to edit the display text for that option in the HTML. For example, to change the "Photoduplication Request" option on the "New Requests" dropdown menu to display "Photocopy Request" instead, you would make the following change:
|
Change this (default line 27): |
|
To this: |
If you change the name of a page in the dropdown menu, you should also make that change on the corresponding web page to which it links, and on any other affected pages.
In the previous example, because the name of the link to the Photoduplication Request form has been changed from "Photoduplication Request" to "Photocopy Request," PhotoduplicationRequest.html and EditPhotoduplicationRequest.html should be edited to display "Photocopy Request" to the user instead of "Photoduplication Request."
Removing a Menu Option
You can remove an option from a dropdown menu by commenting out the code for that option. For example, to remove the "Photoduplication Request" option in the "New Request" dropdown menu, you would make the following change:
|
Change this (default line 27): |
|
To this: |
Edit Font and Color
The colors and fonts used to style the Aeon web pages can be edited in the custom.css file. By default, Aeon uses the Google Fonts library. Your marketing department may require you to point to a specific font for branding purposes. If so, you can edit the font library that Aeon points to by adding the following code to custom.css and changing the import URL:
custom.css (add to default line 6)
@import url('https://fonts.googleapis.com/css?family=Open+Sans|Roboto');Using Developer Tools to Test Changes
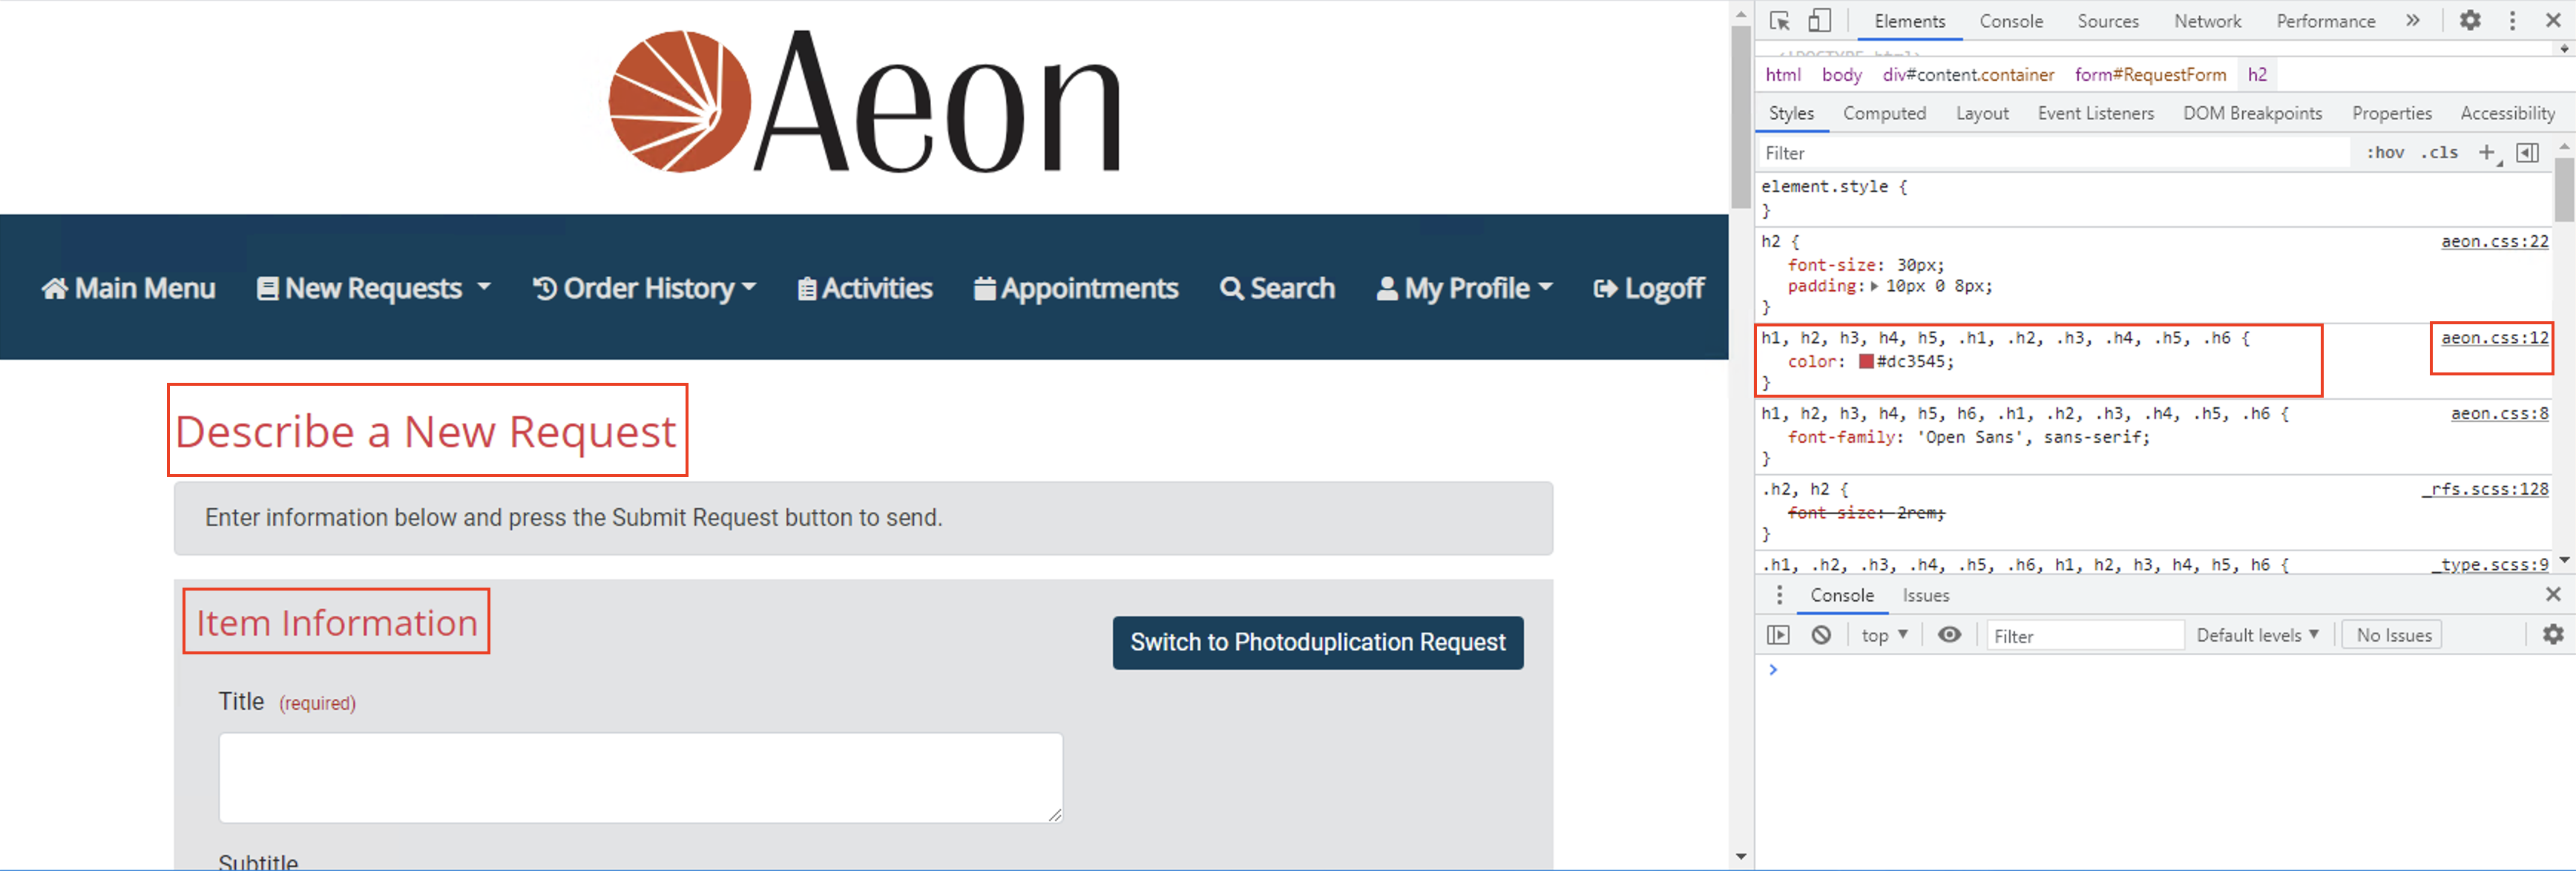
Many browsers have built-in "Developer Tools," which allow you to click on any part of a web page to see which part of the code controls the styling for that part of the page, and also to test changes to the color and font directly in the browser.
In the example below, the color of the "Describe a New Request" and "Item Information" headers has been changed to red using the browser's Developer Tools. The Developer Tools window also contains information specifying that the code to control this setting is located in aeon.css line 12:
Accessing Developer Tools
The following list contains information on how to access the Developer Tools on a few popular web browsers. Please see your web browser's documentation for information on accessing Developer Tools if it is not listed below:
- Google Chrome: Right-click on the part of the page you want to change and click "Inspect."
- Firefox: Right-click on the part of the page you want to change and click "Inspect Element."
- Safari: Right-click on the part of the page you want to change and click "Inspect Element."
Add or Change Fields on Forms
Changing Field Names
You can change the name of a field as it appears on a form by editing its display text. Remember that if you make a change to a field on a request form, you must also make the same change on its corresponding edit page.
For example, to change the name of the "Collection Name/Location" field on DefaultRequest.html to display just "Collection Name" instead, you would make the following change:
|
Change this (default lines 122-126): |
|
To this: |
You would then also need to update that field on EditDefaultRequest.html:
|
Change this (default lines 129-133): |
|
To this: |
Adding Fields
You can customize the request form to add additional available fields, or configure one of the blank item, user, or activity info (e.g., ItemInfo1) fields to add a custom field for any other desired information. The following example shows how to use ItemInfo1 to collect information for a required "Arranger" field on a web request form:
<div class="form-group col-md-9">
<label for="ItemInfo1">
<span class="<#ERROR name='ERRORItemInfo1'>">
Arranger
</span>
<span class="req">(required)</span>
</label>
<input type="text" class="form-control" name="ItemInfo1" id="ItemInfo1" value="<#PARAM name='ItemInfo1'>">

<span class="small-notes">
Please write out the full name
</span>
</div></div>Testing the New Web Pages with OpenURL
After customizing your new web pages, you should test them with your OpenURL link resolver to ensure that there are no issues. To test OpenURL with the new pages, use the following steps:
- Find an item to request via OpenURL.
- Click to request the item. Your Aeon logon page should appear.
- Copy the URL for this page and paste it into a text editor such as Notepad.
- Edit the URL to point to your Testweb server (see the example below).
- Copy and paste the new Testweb URL into your web browser and navigate to this page.
- Log in and review the information on the request form to confirm that the OpenURL link is working properly.
Adding Testweb to the URL
To point your URL to Testweb, just add "testweb" to the beginning of the link address. Please note that your URL may be slightly different than the examples below depending on how your web pages are configured.
|
Change this:
|
|
To this:
|
Testing the New Web Pages with EAD Finding Aids
After customizing your new web pages, you should test them with your EAD request link resolver to ensure that there are no issues between the new web pages, your XSLT file, and your finding aid database. To test this functionality with the new pages in Testweb, use the following steps:
- Find an item to request via your finding aid interface.
- Click to request the item. Your Aeon logon page should appear.
- Copy the URL for this page and paste it into a text editor such as Notepad.
- Edit the URL to point to your Testweb server (see the example below).
- Copy and paste the new Testweb URL into your web browser and navigate to this page.
- Log in and review the information on the request form to confirm that the EAD request link is working properly.
Adding Testweb to the URL
To point your URL to Testweb, just add "testweb" to the beginning of the link address. Please note that your URL may be slightly different than the examples below depending on how your web pages are configured.
|
Change this:
|
|
To this:
|
Step Three: Go Live
When you have made all the necessary customizations to the new web pages and have tested them thoroughly using Testweb, the next step is to go live by moving the new pages from the Testweb directory to the Production directory (default location: C:\Program Files (x86)\Aeon\Web).
Implementation Process for Sites in the PCI Environment
If your institution is using a credit card payment provider gateway, your web pages will need to undergo a secure code review before implementation into production in order to adhere to PCI security requirements. After the code review, Atlas Staff will put the new pages into production for you. If you have any questions or would like to schedule a code review, please contact Atlas Support at support@atlas-sys.com.
Implementation Process for Sites using Remote Authentication
If your institution is using remote authentication, you will have to perform the implementation process for both your unprotected and protected web directories and also make sure to test your dual authentication landing page (index.cshtml), if applicable. Please note that the dual authentication landing page does not have a Testweb. Any edits must be made on the live page and should be tested as soon as it is published.