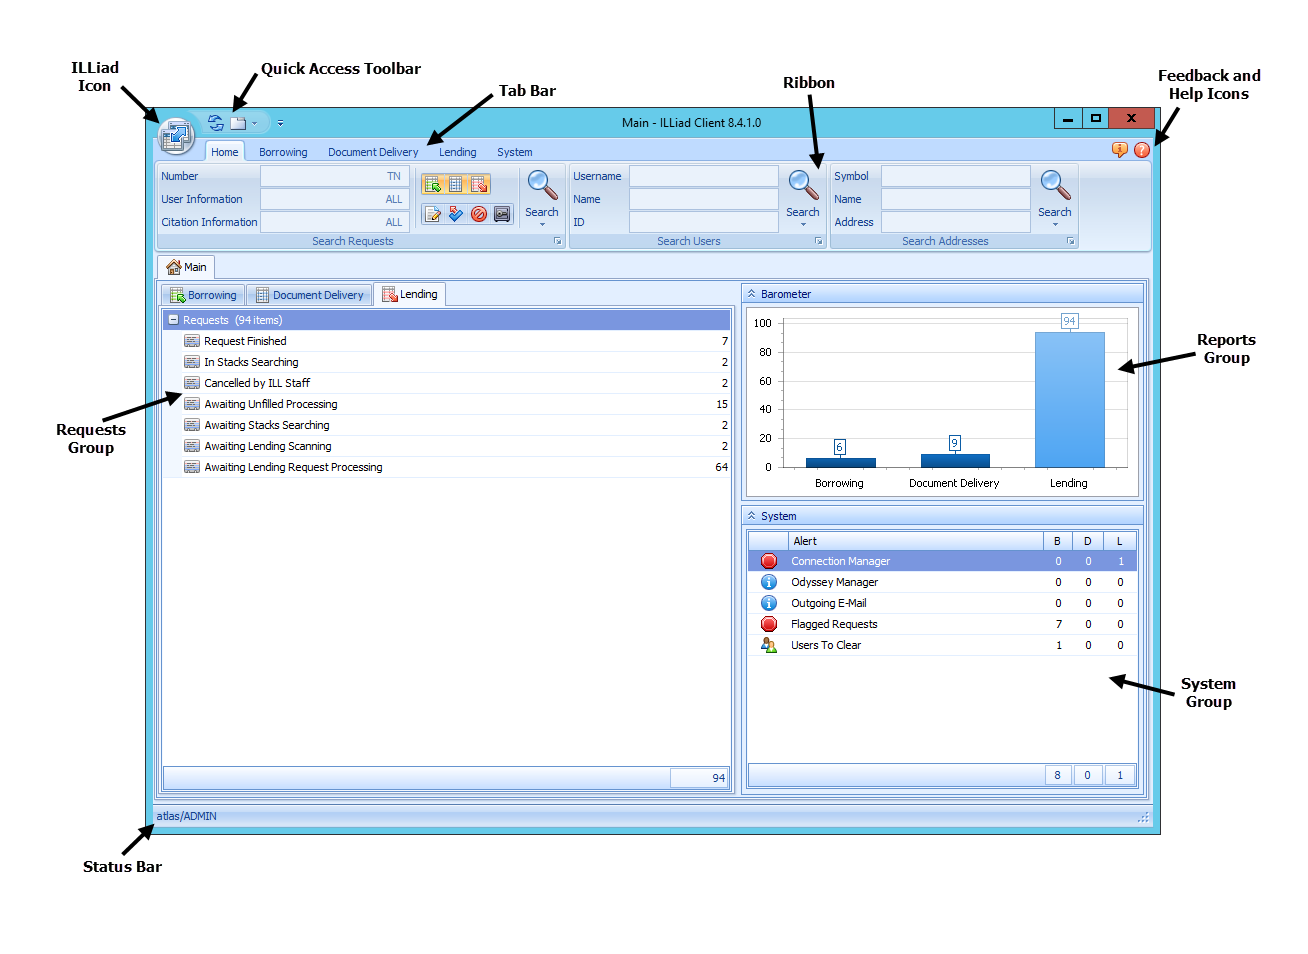
The ILLiad client is designed to keep all of the information you may need to access at your fingertips. This is accomplished through the use of multiple tabs and features on the Main page, designed to summarize and simplify the Interlibrary Loan workflow process.
You can hover over most of the icons and tabs on any of the forms and pages in the ILLiad client to see a popup explanation of the icon or tab.
Features of the ILLiad home page:
- The ILLiad Icon holds print and saves commands as well as other options.
- The Quick Access Toolbar houses the Refresh and Change Form icons.
- The Tab Bar contains tabs that house the Home, Borrowing, Document Delivery, Lending and System ribbons.
- The Ribbon contains buttons and drop-down menus specific to the Home, Borrowing, Document Delivery, Lending and System tabs. The Home tab houses the Search Ribbon.
- The Feedback and Help Icons provide links to Atlas documentation and feedback forms.
- The Status Bar displays the logged-in username and site.
- The Requests Group contains tabs for the Borrowing, Document Delivery, and Lending modules. Each tab contains a list of queues and requests for that module.
- The Reports Group houses the Barometer report by default and offers quick access to the reports available in ILLiad Web Reports.
- The System Group lists all Alerts (messages or errors) from services within the system and offers a convenient way to quickly clear new Users.
The ILLiad Icon
The ILLiad icon holds the Printer Setup, Print Sessions, Save Layouts, Change Password and Exit commands, the Quick User Switching feature and an Options form.
- Printer Setup allows you to choose your default printer and print settings.
- Print Sessions compiles a list of all printing sessions and allows you to reprint sessions.
- Save Layouts allows you to save the customizations you make to the layout of your forms.
- Change Password enables the currently logged in user to change their password.
- Exit closes the client.
- Options hold the Customize and Resources forms. Use Customize to specify different font colors for your Borrowing, Document Delivery and Lending Modules and Blocked / Disavowed Users, and make changes to the client log for support feedback. The Resources form holds important information about your database connections, ILLiad module versions, and helpful links to ILLiad documentation, OCLC, Atlas TLS and the Atlas website.
- Quick User Switching allows staff to quickly switch between users on the same workstation.
Quick Access Toolbar
The Quick Access Toolbar houses the Refresh and Change Form icons.
- Refresh allows you to instantly update data on the form. For example, clicking Refresh after clearing a new user updates the number of "Users to Clear" left in the queue.
- Change Form allows you to switch between forms or close all forms except the Main form. The selected form is visible on the main page, its tab is highlighted, and the title shows as the header at the top of the page.
Placing Ribbon Icons on the Quick Access Toolbar
The quick access toolbar is a handy feature that allows you to place commonly used buttons in one easy to access place so that you don't have to search through different tabs to find the commands or fields you use the most. Generally, any commands or fields, including text fields and checkboxes, that exist on the ribbon can be added to the quick access toolbar. This is done by simply right-clicking the command or field and selecting the "Add to Quick Access Toolbar" option.
To remove commands from the quick access toolbar, simply right-click the command or field and select "Remove from Quick Access Toolbar." By default, the quick access toolbar displays along the top of the window right next to the application icon. It can be moved to display underneath the ribbon by clicking the little arrow to the right of the quick access toolbar, or by right-clicking on any command or field on the ribbon or on the quick access toolbar, and selecting the "Show Quick Access Toolbar Below the Ribbon." To reverse this, click the arrow again and select "Show Quick Access Toolbar Above the Ribbon."
The Tab Bar
The tab bar displays the titles of the tab available on the menu. It also indicates which tab is currently selected by highlighting the active tab and displaying it as connected to the currently viewed ribbon.
Clicking on a tab opens the ribbon to display that tab. In addition, double-clicking any of the tabs will cause the ribbon bar to be minimized (if not already minimized) or maximized (if currently minimized).
Feedback and Help Icons
The Feedback icon, located on the right side of the ILLiad client, allows you to open the Feedback form from any page in the ILLiad client. ILLiad collects data about the issue from several tabs on the form. When you save the form, the data is transferred to a .zip file that you can easily email to support.
In addition to the Feedback icon, there is a Help icon on all forms in the ILLiad client. This is located at the top right of the client, and displays as a ? in a red bubble. Clicking this icon will link you to the current ILLiad documentation on the Atlas Documentation website.
Requests Group
The ILLiad Requests group shows a complete list of all requests for each of the Borrowing, Document Delivery and Lending modules. ILLiad displays all request statuses that contain at least one request in the queue. This allows staff to see all items within ILLiad at a glance. Clicking on a queue opens the queue so you can view each transaction. This will change the name at the top of the page from the main page to the name of the queue that is opened, and it will change the ribbon components.
Hiding Queues
To hide a queue, right click on the queue and select Hide this Queue on the context menu. Return hidden queues to the queues list by right-clicking inside the queues list and selecting Reset to Default View on the context menu. Requests in hidden queues are not counted in the total requests field visible on the status bar.
Reordering Queues
To reorder a queue, simply click on the queue and drag it to the applicable location. The default order is alphabetical, but staff can reorder the list to a configuration that matches the ILL process or move queues that aren't relevant to the bottom of the list.
Adding and Reordering Categories
In addition to reordering queues, staff can also right-click on a queue and add it to a new category on the grid. For example, if you have certain queues that are a priority, right-click on a queue and create a "High Priority" category. You can now drag any other queues you want into that category. Reorder categories by clicking and dragging them either directly above or below any other category. For example, finished statuses like Request Finished or Cancelled by ILL Staff can be put into a "Finished" category and reordered to the bottom of the list.
Returning to Default View
Custom categories will disappear if there are no pending transactions. When new transactions are placed in queues that are within the custom categories, the category will return.
To remove categories and return queues to the default layout, simply right-click a category or queue and select Reset to Default View. Reordered queues and added categories are saved upon logout for each individual user, and will remain as designed unless returned to the default view.
Reports Group
The Reports group gives an overview of processing at a glance. The Barometer, shown by default, is a quick "at a glance" view of the number of transactions in each module requiring an action of some kind. You can determine the maximum number of transactions displayed in each module and specify which queues are included in the Barometer in the Customization Manager. A selection of the same reports available in ILLiad web reports are available to add to the Reports group. For each report added, the group shows the most recent 30 days of activity.
System Group
The System Group contains an all-in-one view of Alerts, or system information messages and errors from services within the system. Staff can view error messages and see counts of items at that status directly from the Main page without having to open a separate form.
Alerts are available for these systems:
- The Connection Manager
- Flagged Requests
- The Odyssey Manager
- Outgoing Email (Pending and Failed)
- Users to Clear
In the Borrowing and Document Delivery modules, staff can view a count of Users that need to be cleared. Double click on Users to Clear to access the Clear User form.