
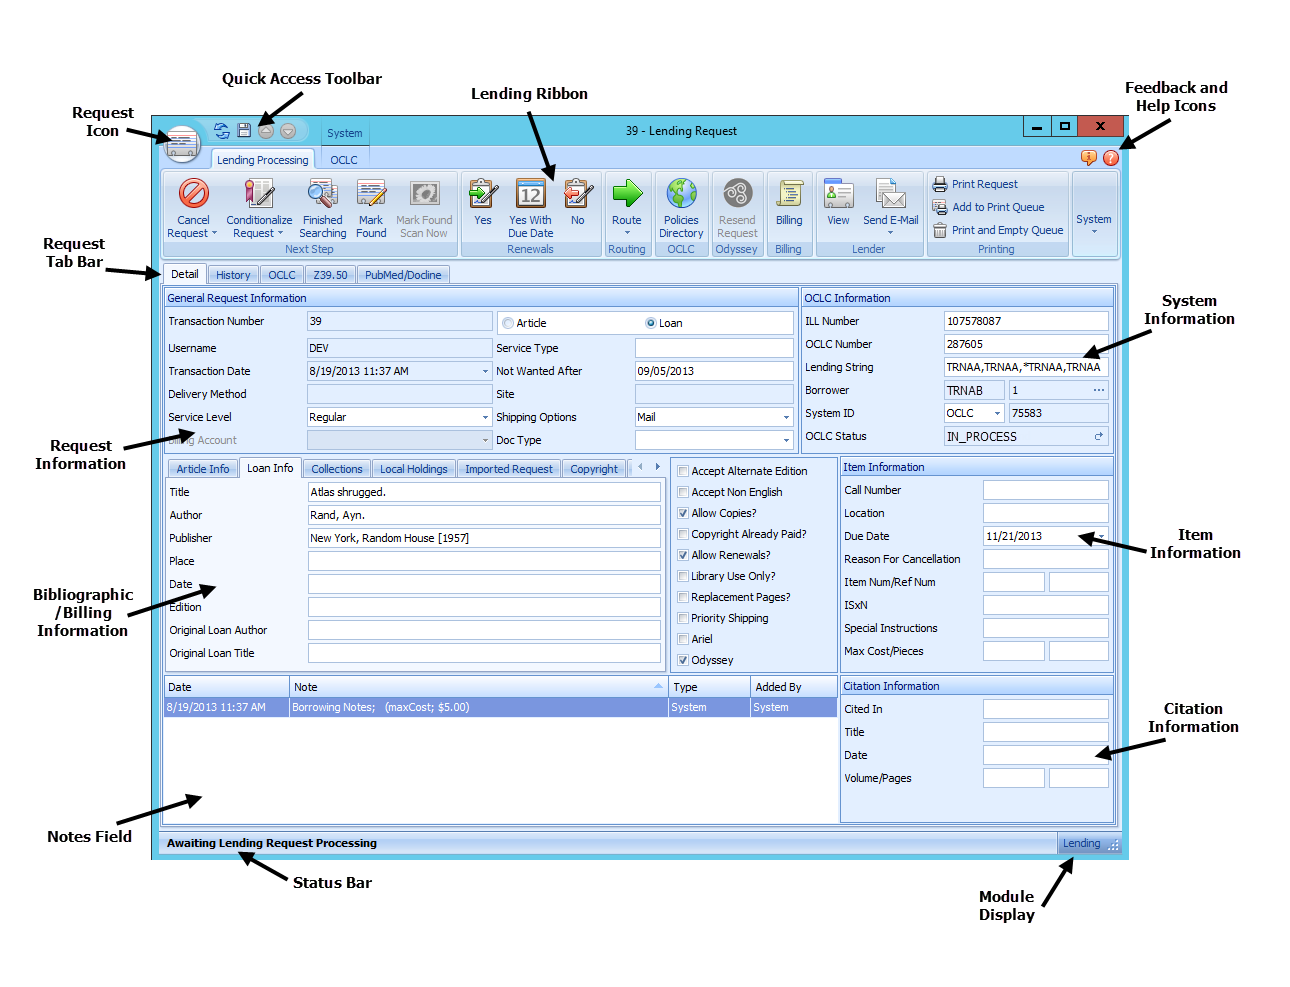
Features of the Lending Form:
- The Request Icon contains the print and exit commands.
- The Quick Access Toolbar houses the Refresh and Change Form icons.
- The Feedback and Help Icons provide links to Atlas documentation and feedback forms.
- The Lending Ribbon displays all the buttons related to the Lending process.
- The Request Tab Bar displays the available processing tabs.
- The Request Information group displays patron and request information.
- The Bibliographic/Billing Information group displays citation, holdings, and billing information.
- The System Information group displays OCLC or other request type information.
- The Item Information group displays local information and notes.
- The Citation Information group displays additional request information.
- The Notes Field contains any user or staff notes.
- The Status Bar displays the queue the request is currently in.
- The Module Display shows the module the request belongs to.
Adding Fields to the Request Form
Some fields are available to add to the Request form but are not visible on the form by default. Examples are the Status, Patron, PMID and DOI fields. You can use the customizing features to add these fields to your Request form.
ItemInfo fields 1-5 can be used to add additional user-defined text fields to store additional information. These fields are not displayed by default.
Hovering over certain fields in the Request forms displays a tooltip showing the complete text in these fields. Fields included are Call Number, Location, Journal Title, Article Author, Article Title, Loan Title, and Loan Author.
The Request Icon
The Request Icon allows you to print or close the opened request.
- Print Request (or Ctrl + P) prints the request using the PrintRequest.doc template.
- Close closes the request.
The Quick Access Toolbar
The Quick Access Toolbar houses
- Refresh allows you to instantly update data on the form.
- Save will save any changes made on the form. Unsaved changes are highlighted in yellow.
- Show Previous Transaction will close the opened request and open the previous request in the queue.
- Show Next Transaction will close the opened request and open the next request in the queue.
The Feedback and Help Icons
The Feedback icon, located on the right side of the ILLiad client, allows you to open the Feedback form from any page in the ILLiad client. ILLiad collects data about the issue from several tabs on the form. When you save the form, the data is transferred to a .zip file that you can easily email to support.
In addition to the Feedback icon, there is a Help icon on all forms in the ILLiad client. This is located at the top right of the client, and displays as a ? in a red bubble.
See Submitting Error Feedback for more information.
The Lending Ribbon
The Request form contains a content-sensitive ribbon that reflects Lending processing and workflows. While the Request form ribbon generally stays the same throughout the Lending process, note that the Process / Next Step section of the ribbon may vary according to the request status location.
Some of the commands, such as Routing, contain menus to choose an action. Some perform an action, such as Cancel Request, and some, like Policies Directory, take you to a new location. Features that are not active in a particular queue are greyed out. The Lending ribbon at Awaiting Lending Request Processing displays:
|
Next Step |
Renewals |
Routing |
OCLC |
Odyssey |
Billing |
Lender |
Printing |
System |
|---|---|---|---|---|---|---|---|---|
|
Cancel Request |
Yes |
Route |
Policies Directory |
Resend Request |
Billing |
View |
Print Request |
Pending Updates |
|
Conditionalize Request |
Yes With Due Date |
|
|
|
|
Send E-Mail |
Add to Print Queue |
|
|
Finished Searching |
No |
|
|
|
|
|
Print and Empty Queue |
|
|
Mark Found |
|
|
|
|
|
|
|
|
|
Mark Found Scan Now |
|
|
|
|
|
|
|
Mark Found and Mark Found Scan Now Buttons
The Mark Found and Mark Found Scan Now process buttons on the Lending request form perform the same process as those on the Update Stacks Search form, including billing and routing to the appropriate status. If the request is at the status Awaiting Lending Request Processing and opened from status queues, these buttons route the request through the Awaiting Stacks Searching and In Stacks Searching statuses to help maintain compatibility with existing reports and tracking.
The History tab of the ILLiad request form tracks processing of the request using the Mark Found / Mark Found Scan Now buttons. If the Lending request is at Awaiting Lending Request Processing these buttons update the OCLC request status to SHIPPED.
Once a Billing Account has been added and the request has been saved, a System/OCLC tab appears at the top left of the each of these request forms. More information is available in the Billing section of the User Guide.
Request Form Tab Bar
Much like the ILLiad main page, the Request form contains a variety of tabs on the open tab bar, displaying different information and allowing staff to switch between active forms without opening multiple forms. These multiple tabs on the Request form allow staff to compare the results from OCLC searching, Z39.50 sources, and Pubmed all on the same form. As more sources are added to the Request form, staff can have multiple search results available to make the best choice for fulfillment. In addition to the default tabs, staff can create additional tabs to hold information from those default tabs as they customize the layout. The defaults tabs are:
|
Default Tab |
Explanation |
Available Information Panels and Tabs |
|---|---|---|
|
Detail |
This is the main page of the Request form. |
General Request Information, System Information, Item Information, Bibliographic / Billing / Borrower Information, Citation Information, and Notes |
|
Z39.50 |
Houses the processes and forms for searching your Z39.50. |
Searching, Record Detail |
|
History |
Displays change and updates to the request as well as an email history. |
Tracking, E-Mail History, History, Resubmission |
|
PubMed/Docline |
Holds the processes and forms for performing PubMed/Docline searches. |
Searching, Record Detail, Docline |
|
OCLC |
Houses the processes and forms for searching and submitting requests to OCLC. |
Searching, Record Detail, Holdings, Work Form |
Some of the tabs on the Request form, LenderAddress form, Main form, and User Information form can be dragged off the form and opened as a separate form. Primary and Addon tabs on these forms can also be reordered.
OCLC Item Availability Web Service
If your site has configured ILLiad to use the OCLC Item Availability Web Service, the Lending request form displays your library's holding information on a separate tab on the form.
General Request Information
This section contains your Transaction Number, Username and specifics about request Delivery Method, Service Level, Shipping Options and Billing Account. Fields are:
- Transaction Number
- Username (Lending by default)
- Transaction Date
- Delivery Method
- Service Level
- Billing Account
- Article/Loan
- Service Type
- Not Wanted After
- Site
- Shipping Options
- Doc Type
Bibliographic/Billing Information
The ILLiad Request form combines the billing and bibliographic sections together using multiple tabs. In addition, the Imported Request tab shows the OCLC work form information as a series of distinct fields separated by spaces. The Borrowing Library's information is also stored here. Fields are:
- Article Info
- Loan Info
- Collections
- Local Holdings
- Imported Request
- Copyright
- Invoice
- Additional
- Library
Specifics of the request are held here along with corresponding checkboxes:
- Accept Alternate Edition
- Accept Non-English
- Allow Copies?
- Copyright Already Paid?
- Allow Renewals?
- Library Use Only?
- Replacement Pages?
- Priority Shipping
- Ariel
- Odyssey: The Odyssey checkbox indicates that an article request can be sent using Odyssey. A Missing TN message indicates that there is no Borrowing Transaction number for the request. A Missing IP message indicates that the borrowing library does not have an Odyssey IP listed in the system.
The Imported Request Tab
The OCLC import information pane on the Lending Request form is located under the Imported Request tab. The OCLC work form information appears in the Imported Request pane as a series of distinct fields separated by spaces.
Imported Request Field Order
The order of the OCLC fields and which fields display in the Imported Request pane of the Lending Request Form are determined in the OCLC Resource Sharing Settings. These settings are accessed from the ILLiad client's Main page under the System Ribbon by clicking on Resource Sharing Settings. Access to the OCLC Resource Sharing Settings through the ILLiad client is either granted or denied by settings specific to your username in the Staff Manager. Your ILLiad username will need to be granted access to this function before you will be able to access it. For all users denied access to these functions, the OCLC Resource Sharing Settings option will be grayed out on the System ribbon. For further information about OCLC Resource Sharing Settings, see the section titled OCLC Resource Sharing Settings under Maintenance Functions.
System Information
The System Information section was called the OCLC Information section in previous versions of ILLiad. Note that the name of this section will change depending upon the System ID selected in ILLiad. When you are searching OCLC and have a System ID of OCLC, the name of the section is OCLC Information. When you are searching DOCLINE, it's called Docline Information. Processing and using the fields for each type of search are found in Searching Lending Requests. Fields are, using OCLC as an example:
- ILL Number
- OCLC Number
- Lending String
- Borrower
- System ID
- OCLC Status
Real-Time OCLC Status Display
Several automatic OCLC lookup features are built into the Request form. They are included in the System Information section.
Automatic OCLC Status Lookup
The Request form contains an OCLC Status field, located at the bottom of the System/ OCLC Information section of the form. When the Request form is opened, the system performs a search of the OCLC system for the record. The automated searching feature may be enabled/disabled in the Customization Manager under System | OCLC by changing the AutoCheckOCLCStatus key from Yes to No.
The current status of the transaction in OCLC will display in the OCLC Status field when found. If the OCLC Status of the transaction is Shipped, the ship date will appear in the OCLC Status field next to the status. There may be a several-second delay between opening the form and displaying the OCLC Status value while this search is being performed. This search is performed in the background and will not prevent you from performing any other actions from the Request form.
Manual OCLC Status Lookup
To update your OCLC Status value by performing a manual lookup of the current OCLC Status, you may do so by clicking the refresh button (the arrow to the right of the OCLC Status field). This button also serves as a manual means of looking up the OCLC Status for those institutions that decide to disable the automatic OCLC Status Lookup feature.
Real-Time Lending String Progress Indicator
In addition to the OCLC Status, the Lending String is also searched upon opening the form. The asterisk  will appear before the appropriate symbol to indicate the current location of the request in OCLC.
OCLC Policies Directory Lookup
If there is a Borrower symbol specified in the transaction record, you can also access the OCLC Policies Directory record for that symbol by clicking the ellipsis, (shown as . . . ) in the Borrower Address field to the right of the Borrower value. Clicking that button will open the Lender Selection form. Log on to the OCLC Policies Directory by clicking the globe icon to the right of the Symbol field and perform a search for the specified symbol. From here you may check the policies associated with the specified institution.
Note that the OCLC Policies Directory is also accessible from the Lending Processing ribbon.
LenderAddresses Entry Lookup
If there is a Borrower symbol and address number specified in the transaction record, you can access the Lender Selection form for that symbol by clicking the ellipsis, (shown as . . . ) in the Borrower Address field to the right of the Borrower value. This will display the Lender Selection form, which contains information about the specified Symbol and address number.
If no address number has been specified in the transaction record for the transaction, ILLiad will not be able to perform this lookup. Opening the OCLC Policies Directory either from the ribbon or as described above, will open a web browser, log on to the OCLC Policies Directory, and perform a search for the specified symbol. From here you may check the policies associated with the specified institution.
Item Information
Here you will find:
- Call Number
- Location
- Due Date: Based on the settings in the Customization Manager
- Reason for Cancellation
- Item Num/Ref Num
- ISxN
- Special Instructions
- Max Cost/Pieces
Citation Information
Displays the Cited In fields:
- Cited In
- Title
- Date
- Volume/Pages
Notes Field
The Notes section of the Request form shows any notes that have been added by the system, staff or lenders, or via ISO ILL or OCLC Alert. Once a request has been created you can add and delete notes.
Status Bar
The current Transaction Status for the request appears in the Status Bar at the bottom of the form. If you want to add the Transaction Status field to your Request form you can do that by using the Customize Layout Feature.
Module Display
When the Lending Request form is open, the Windows Task Bar displays the module that houses the display: Borrowing, Lending or Document Delivery.