
This article contains instructions for implementing the appointment scheduling features on your web pages. These web pages and their associated features are not installed by default and must be manually added to your web directory and request forms.
Implementing Appointment Scheduling Web Pages | Implementing Appointment Controls on EADRequest.html
Before You Start: Compatibility Check
- These web pages are not compatible with the pre-v5.0 Aeon web pages. Your web pages must be v5.0 or later to implement the new appointment scheduling pages. You must also be on v5.1 or later of Aeon to make use of this feature.
- Due to the extensive use of JavaScript, these web pages are not supported for use on the Internet Explorer browser. Firefox, Chrome, and Edge are all supported browsers for this feature.
Implementing Appointment Scheduling Web Pages
Step One: Add New Pages to the Web Directory
- Download the latest feature-specific Appointment Scheduling web pages.
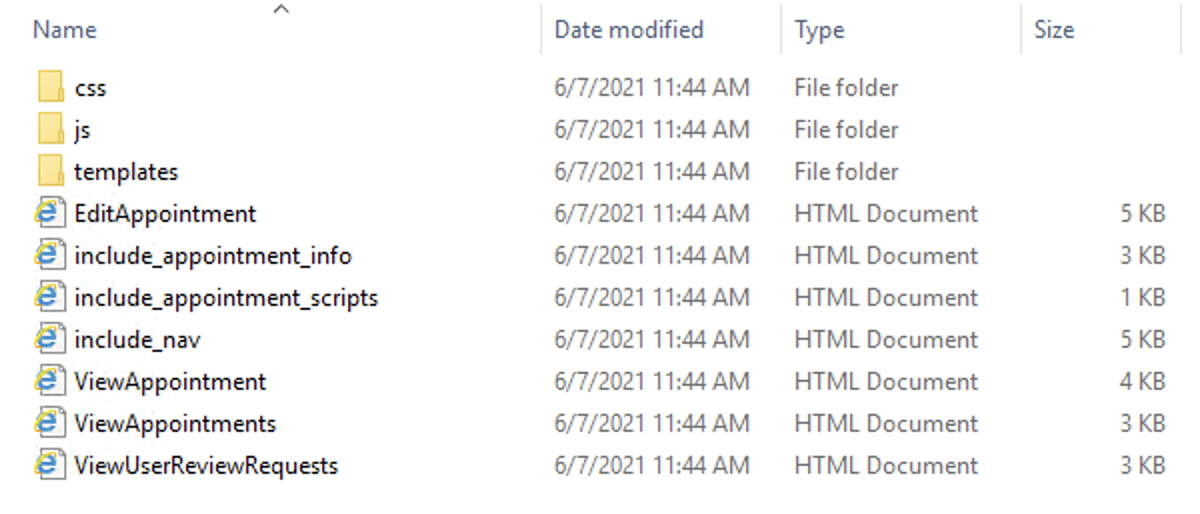
- Open the downloaded FeatureSpecificPages\AppointmentScheduling folder and copy the contents (pictured below) into either your Aeon web directory (default location: C:\Program Files (x86)\Aeon\Web) or your Testweb directory if you would like to first test the changes:
Required Updates for Older Web Page Versions
If you have not yet updated to the v5.1 default web pages, there are additional edits to several default web pages you will need to make to ensure their compatibility with the appointment scheduling pages:
- Download the latest version of the 5.1 default web pages and replace atlasUtility.js in your web directory with the updated file.
- Ensure that header classes added to the default CSS in v5.0.73 of the default web pages have been added to your aeon.css and custom.css (if applicable) files according to the instructions available here.
-
As of v5.1, the RequestsInReviewDataRow.html template file has been renamed to DataRow_ReviewRequest.html. The new ViewUserReviewRequests.html file used with the appointment scheduling pages makes reference to DataRow_ReviewRequest.html on line 32:
<#DATAREPEATER Name="RequestsInReview"
TemplateFile="Templates\DataRow_ReviewRequest.html"
      NoDataAction="<div class='no-data-message'>You do not currently
        have any requests in review</div>">
If your web directory contains this file under the old name, please either change the reference to this file in ViewUserReviewRequests.html to use the old filename or rename the RequestsinReviewDataRow.html file in your web directory to use the updated name.
Warning!
Copying the contents of the AppointmentScheduling folder into your web directory will overwrite your include_nav.html and ViewUserReviewRequests.html files. If you have made customizations to those files that you do not want to lose, please follow the instructions below.
ViewUserReviewRequests.html
If you have made customizations to your ViewUserReviewRequests.html file that you do not want to lose, please move your customizations to the new file in the AppointmentScheduling folder before copying the folder to your web directory.
include_nav.html
If you have made customizations to your include_nav.html file that you do not want to lose, please delete the include_nav.html file in the AppointmentScheduling folder before copying the folder to your web directory.
The following code can then be manually added to your pre-existing include_nav.html file to include a link to the Appointments page in your navigation bar:
<li class="nav-item">
        <a class="nav-link" href="<#ACTION action='10' form='94'>">
                <span aria-hidden="true" class="fas fa-calendar"></span> Appointments
        </a>
</li>
Step Two: Edit Request Forms
Once the new pages are added to your web directory, you will need to edit your request form pages to include the new appointment scheduling fields and controls. Make sure to add appointment scheduling features to both the normal request form and its corresponding edit page:
-
- Navigate to your Aeon web directory (default location: C:\Program Files (x86)\Aeon\Web) or Testweb directory.
- Make backup copies of the files you need to edit and save these in another location.
- Open the copy of the file for editing in a text editing application such as Notepad++.
- Within the file, navigate to where you want to add the appointment scheduling content.
- Add the following line, which will add automatically add the fields for RequestLink (RequestFor), Site, Reading Room and Appointment, as well as a New Appointment button to activate the web scheduler on the request form:
<#INCLUDE filename="include_appointment_info.html">A special process is required to add these fields to EADRequest.html. Please see the Adding Appointment Controls to EADRequest.html section below.Avoiding Duplicate Site Fields
Adding the line of code above will create a duplicate instance of the Site field on your request forms if you had been previously using this field as an option on those forms. There are two options for removing the duplicate Site field that you may choose from depending on which would work best with your specific web page configuration:- Remove any instances of the Site field from each request form before adding the code for the include_appointment_info.html include file to each form. The Site field will then be added to the form through the include file.
- Remove the Site field from include_appointment_info.html (default lines 16-25) before adding the code for the include_appointment_info.html include file to your request forms. This will allow you to keep your existing instance of the Site field on each form, as it will not be added through the include file. If using this option, please ensure that the existing Site field on your request forms has an id="Site" attribute defined on its select element as shown in the example below:
<select class="custom-select mr-sm-2" id="Site" name="Site" size="1">
- Review the other contents of the file and remove any instances of the RequestLink field. This is necessary to avoid having duplicate inputs of this field that will cause errors, since a new instance of this field will be added to your form through the step above.
-
Review the contents of the file and remove any instances of the ScheduledDate field, if you have been using this feature.
If you have been using Scheduled Date as a required field, you will also need to delete the Scheduled Date entry from the WebValidation table after removing it from your request forms. - Save your changes and close the file.
- Repeat steps 4-9 for all files that need to be edited to include the appointment scheduling controls.
- If using Testweb, test your new request forms. When testing is complete, add the new files to your Aeon web directory (default location: C:\Program Files (x86)\Aeon\Web) and go live.
Implementing Appointment Controls on EADRequest.html
The process for implementing appointment controls on the EAD Request form (EADRequest.html) is slightly different due to the specialized nature of this form. Please follow the instructions in each section below to implement the appointment fields on this request form.
Adding Appointment Controls to EADRequest.html | Enforcing the Appointment Requirement on EADRequest.html
Adding Appointment Controls to EADRequest.html
Before adding the appointment controls to EADRequest.html (see step 5 above), the name attribute on the RequestLink, Site, ReadingRoomID, and AppointmentID fields should be modified to contain the value "FormDataField." The modified fields can be added to this file using either of the two options below:
Option 1: Make a copy of the include_appointment_info.html file specifically for EAD requests
- Follow the steps as described in the Edit Request Form section above until you reach step 5
- When you reach step 5, make a copy of the include_appointment_info.html file and name this copy include_appointment_info_ead.html
- Open the new include_appointment_info_ead.html file in a text editor such as Notepad++
- Edit the name attribute following the example in the Adjusting the Name Attribute section below for the RequestLink, Site, ReadingRoomID, and AppointmentID fields, and save the file when you are finished
-
Add the appointment controls to EADRequest.html using the following line of code:
<#INCLUDE filename="include_appointment_info_ead.html"> - Continue the process in Edit Request Forms from step 6 onward.
Option 2: Copy the contents of include_appointment_info.html directly into EADRequest.html
- Follow the steps as described in the Edit Request Forms section above until you reach step 5
- When you reach step 5, open the include_appointment_info.html file in a text editor such as Notepad++
- Copy the contents of this file and then paste them directly into the EADRequest.html file instead of using the <#INCLUDE filename="include_appointment_info.html"> code to add these fields
- Edit the name attribute on the RequestLink, Site, ReadingRoomID, and AppointmentID fields you have just copied to EADRequest.html following the example in the Adjusting the Name Attribute section below
- Continue the process in Edit Request Forms from step 6 onward.
Adjusting the Name Attribute
The name attribute for the RequestLink, Site, ReadingRoomID, and AppointmentID fields on EADRequest.html should be adjusted as follows:
|
Change this: |
To this: |
Enforcing the Appointment Requirement on EADRequest.html
Due to the various customization options available for the EAD Request form (EADRequest.html), standard built-in Aeon web validation to ensure that an appointment is selected on requests for reading rooms requiring appointments will not apply by default on EADRequest.html. If you would like to enforce the appointment requirement on the EADRequest.html form, this functionality can be configured manually in one of two ways depending on if your form uses a toggle option allowing users to switch between a photoduplication or reading room request before the form is submitted:
- Enforcing Appointments on EAD Request Forms Without a Photoduplication Toggle Option
- Enforcing Appointments on EAD Request Forms Using a Photoduplication Toggle Option
Enforcing Appointments on EAD Request Forms Without a Photoduplication Toggle Option
If your EADRequest.html form does not contain a toggle option allowing patrons to switch between making a photoduplication or reading room request for the requested materials before the form is submitted, then you can enforce the appointment requirement by adding the following entries for the AppointmentID field and EADRequest form in the WebValidation and WebFormValidationLinks tables in the Aeon Customization Manager:
WebValidation
| RuleSet | FieldName | Validation | Error | ErrorTag |
| Appointments | AppointmentID | .+ | An appointment is required. | ERRORAppointmentID |
WebFormValidationLinks
| FormName | RuleSet |
| EADRequest | Appointments |
The appointment controls on your EADRequest.html form should then be updated with text to indicate that the AppointmentID and RequestLink fields are required:
- Navigate to the AppointmentID and RequestLink fields that you either added directly to the EADRequest.html file or in a separate include_appointment_info_ead.html file depending on which option you chose to add these fields to the form described in the previous section.
- Make the following changes to add text to each field indicating that the field is required:
RequestLink
<div class="form-group col-md-5
<#PARAM name='RequestLinksVisible' enabled='RequestForEnabled'
disabled='d-none'>">
<div id="username" hidden><#PARAM name="Username"></div>
<label for="RequestLink">
<span class="<#ERROR name='ERRORRequestLink'>">
Request for
<span class="req">(required)</span>
</span>
</label>
<select class="custom-select mr-sm-2"
id="RequestLink" name="FormDataField" size="1" aria-required="true">
<#OPTION name="RequestLinks">
</select>
</div>
AppointmentID
<div class="form-group col-md-5 appointments-enabled">
<label for="AppointmentID">
<span class="<#ERROR name='ERRORAppointmentID'>">
Appointment
<span class="req">(required)</span>
</span>
</label>
<select class="custom-select mr-sm-2" id="AppointmentID"
name="AppointmentID" data-persisted-value="<#PARAM name='AppointmentID'>"
size="1" disabled aria-required="true"></select>
<button type="button" id="NewAppointment"class="btn btn-primary"
data-toggle="modal" data-target="#SchedulerModal">New Appointment</button>
</div>
Enforcing Appointments on EAD Request Forms Using a Photoduplication Toggle Option
If your EADRequest.html form contains a toggle option allowing patrons to switch between making a reading room request or a photoduplication request for the requested materials before the form is submitted, then you will not be able to use the WebValidation table to require the AppointmentID field on this form. In this case, you can require appointments by adding the HTML5 'required' attribute to the AppointmentID and RequestLink fields used on EADRequest.html as follows:
- Navigate to the AppointmentID and RequestLink fields that you either added directly to the EADRequest.html file or in a separate include_appointment_info_ead.html file depending on which option you chose to add these fields to the form described in the previous section.
- Make the following changes to add the required attribute to each field's <select> element and to add text indicating that the field is required:
RequestLink
<div class="form-group col-md-5
<#PARAM name='RequestLinksVisible' enabled='RequestForEnabled'
disabled='d-none'>">
<div id="username" hidden><#PARAM name="Username"></div>
<label for="RequestLink">
<span class="<#ERROR name='ERRORRequestLink'>">
Request for
<span class="req">(required)</span>
</span>
</label>
<select class="custom-select mr-sm-2"
id="RequestLink" name="FormDataField" size="1" required>
<#OPTION name="RequestLinks">
</select>
</div>
AppointmentID
<div class="form-group col-md-5 appointments-enabled">
<label for="AppointmentID">
<span class="<#ERROR name='ERRORAppointmentID'>">
Appointment
<span class="req">(required)</span>
</span>
</label>
<select class="custom-select mr-sm-2" id="AppointmentID"
name="AppointmentID" data-persisted-value="<#PARAM name='AppointmentID'>"
size="1" disabled required></select>
<button type="button" id="NewAppointment"class="btn btn-primary"
data-toggle="modal" data-target="#SchedulerModal">New Appointment</button>
</div>